


On this occasion I will try to share simple tips to beautify the look of your blog. The following tips are ways How To Make Page Number Navigation. With the following menu will make the visitors and readers of your blog is easier to know the content of your blog. Here are the steps :
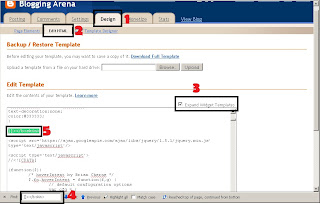
1. Login to your blogger dashboard, then select Design > Edit HTML, do not forget to check the Expand Widget Templates.
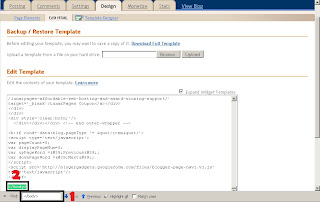
2. Use the search tool ( Ctrl + F ) and find the code ]]></b:skin>, then place the following code before the code ]]></b:skin>
.showpageArea a {
text-decoration:underline;
}
.showpageNum a {
text-decoration:none;
border: 1px solid #cccccc;
margin:0 3px;
padding:3px;
}
.showpageNum a:hover {
border: 1px solid #cccccc;
background-color:#cccccc;
}
.showpagePoint {
color:#333;
text-decoration:none;
border: 1px solid #cccccc;
background: #cccccc;
margin:0 3px;
padding:3px;
}
.showpageOf {
text-decoration:none;
padding:3px;
margin: 0 3px 0 0;
}
.showpage a {
text-decoration:none;
border: 1px solid #cccccc;
padding:3px;
}
.showpage a:hover {
text-decoration:none;
}
.showpageNum a:link,.showpage a:link {
text-decoration:none;
color:#333333;
}
3. After that, find again the following code </body>, and place the following code before the code </body>
<b:if cond='data:blog.pageType != "item"'>
<script type='text/javascript'>
var pageCount=5;
var displayPageNum=5;
var upPageWord ='Previous';
var downPageWord ='Next';
</script>
<script src='http://blogergadgets.googlecode.com/files/blogger-page-navi.v1.js' type='text/javascript'/>
</b:if>
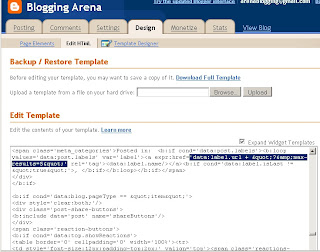
4. And last, find again the code 'data:label.url', and replace the code 'data:label.url' with the code bellow
'data:label.url + "?&max-results=5"'
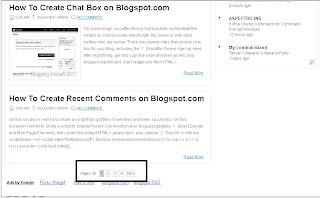
5. After that save your template, and the result will be like the following picture
A few simple tips from me, may be useful to beautify your blog. Thank you ^^
1. Login to your blogger dashboard, then select Design > Edit HTML, do not forget to check the Expand Widget Templates.
2. Use the search tool ( Ctrl + F ) and find the code ]]></b:skin>, then place the following code before the code ]]></b:skin>
.showpageArea a {
text-decoration:underline;
}
.showpageNum a {
text-decoration:none;
border: 1px solid #cccccc;
margin:0 3px;
padding:3px;
}
.showpageNum a:hover {
border: 1px solid #cccccc;
background-color:#cccccc;
}
.showpagePoint {
color:#333;
text-decoration:none;
border: 1px solid #cccccc;
background: #cccccc;
margin:0 3px;
padding:3px;
}
.showpageOf {
text-decoration:none;
padding:3px;
margin: 0 3px 0 0;
}
.showpage a {
text-decoration:none;
border: 1px solid #cccccc;
padding:3px;
}
.showpage a:hover {
text-decoration:none;
}
.showpageNum a:link,.showpage a:link {
text-decoration:none;
color:#333333;
}

3. After that, find again the following code </body>, and place the following code before the code </body>
<b:if cond='data:blog.pageType != "item"'>
<script type='text/javascript'>
var pageCount=5;
var displayPageNum=5;
var upPageWord ='Previous';
var downPageWord ='Next';
</script>
<script src='http://blogergadgets.googlecode.com/files/blogger-page-navi.v1.js' type='text/javascript'/>
</b:if>

4. And last, find again the code 'data:label.url', and replace the code 'data:label.url' with the code bellow
'data:label.url + "?&max-results=5"'

5. After that save your template, and the result will be like the following picture

A few simple tips from me, may be useful to beautify your blog. Thank you ^^


 After Changes


